

If your shower glass still looks cloudy after cleaning, the problem is usually not more dirt. In most cases, I’m dealing with hard water spots, soap scum, cleaner residue, or glass damage – and each one needs a different fix.
Here’s the short version:
- White, gritty spots usually mean mineral buildup
- Waxy or sticky film is often soap scum or body oils
- Smooth streaks are often leftover cleaner
- Smooth haze that won’t change can mean etching, which cleaner will not fix
A few cleaning mistakes make the glass look worse fast:
- Using the wrong cleaner for the type of buildup
- Letting cleaner dry on the glass
- Scrubbing with abrasive pads, powders, or blades
- Skipping the rinse and dry step
- Ignoring hard water, damp tracks, grout, and poor airflow
One stat stands out: a daily squeegee can stop about 80% to 90% of standing water from drying on the glass, and in hard-water homes, spots can return in 3 to 5 days without upkeep.
My takeaway is simple: match the cleaner to the residue, keep it wet for the right dwell time, rinse well, dry the door, and fix the moisture problem behind the spots. If the haze stays and feels smooth, the glass may be damaged, not dirty.
The Best Way to Clean Glass Shower Doors!

Glass Shower Door Cleaner Choice and Application Mistakes
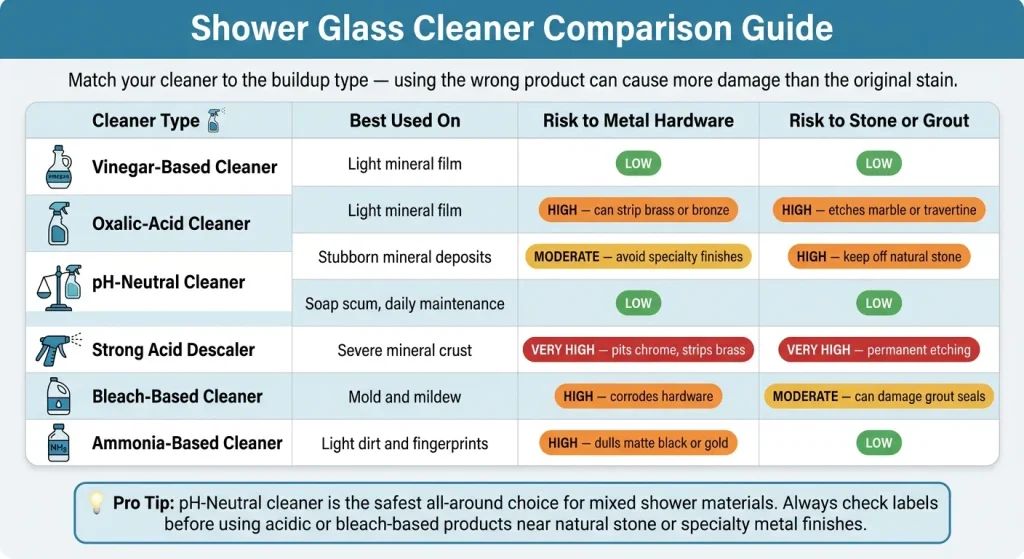 Shower Glass Cleaner Types: What Works, What Damages, and When to Use Each
Using the Wrong Cleaner for Soap Scum, Hard Water, or Oily Film
Once you figure out what is stuck on the glass, the next place people slip up is the cleaner itself. A basic ammonia-based glass spray can handle fingerprints and light surface dirt, but it won’t do much for mineral deposits or soap scum. In some cases, it can leave behind a dull film that makes the glass look worse than it did before [1][2].
The type of haze gives you a clue. Chalky white spots usually mean minerals. A waxy haze usually means soap scum. A greasy layer usually points to body oils or product residue. Mineral spots need an acid-based cleaner, such as distilled white vinegar, citric acid, or an oxalic-acid product [6][5]. Soap scum usually comes off better with a soap-scum cleaner, a gentle bathroom cleaner, or a pH-neutral spray [3][8]. And here’s the catch: even the right cleaner can fall flat if it dries before it has time to do its job.
"Hard water spots aren’t a cleaning problem – they’re a drying problem. When water sits on glass and evaporates, the dissolved calcium and magnesium are left behind." – Dulles Glass [3]
Letting Cleaner Dry on the Glass Before Rinsing
This one sounds minor, but it causes a lot of streaks and haze. If the cleaner dries before you rinse it away, it can leave a sticky or cloudy film that’s tougher to remove than the original buildup [3].
Acidic cleaners like vinegar need about 10 to 15 minutes of contact time to break down mineral film [6][7]. That means the surface needs to stay wet long enough for the cleaner to work. A simple flow works best: apply the cleaner, keep it wet for the label dwell time, scrub gently, rinse well, and dry the glass right away [3][6]. Skip that last drying step, and streaks often show up fast. The same goes for the frame and hardware nearby. Keep the cleaner where you need it, not all over the shower.
Using Cleaners That Can Damage Nearby Finishes
A cleaner might be safe for glass and still be bad news for everything around it. Acidic descalers can etch marble or travertine. Ammonia-based products can dull brushed gold or matte black hardware. Bleach-based cleaners can corrode metal fixtures and make vinyl seals brittle [2][3][5].
For specialty finishes like oil-rubbed bronze or matte black coatings, plain warm water and a microfiber cloth is usually the safest bet [3]. Before you spray anything near the frame, tile, or fixtures, check the label for warnings about natural stone and specialty metal finishes [3][8].
| Cleaner Type | Works On | Risk to Metal | Risk to Stone or Grout |
|---|---|---|---|
| Vinegar-based cleaner | Light mineral film | High (can strip brass or bronze) | High (etches marble or travertine) |
| Oxalic-acid cleaner | Stubborn mineral deposits | Moderate (avoid specialty finishes) | High (keep off natural stone) |
| pH-Neutral cleaner | Soap scum, daily maintenance | Low | Low |
| Strong acid descaler | Severe mineral crust | Very high (pits chrome, strips brass) | Very high (permanent etching) |
| Bleach-based cleaner | Mold and mildew | High (corrodes hardware) | Moderate (can damage grout seals) |
| Ammonia-based cleaner | Light dirt and fingerprints | High (dulls matte black or gold) | Low |
Cleaning Habits That Scratch Glass or Leave Residue Behind

Scrubbing With Abrasive Pads, Powders, or Blades
When glass looks cloudy, the natural move is to scrub harder. That usually backfires.
Steel wool, green scouring pads, and stiff brushes can leave tiny scratches in the surface. Those micro-scratches catch minerals and soap scum, which makes the glass look duller over time instead of cleaner [1][6].
Razor blades cause trouble too. They may look precise, but they can leave microscopic surface damage that pulls in deposits even faster [6]. Magic Erasers can do the same kind of harm. Since they’re made of melamine foam, they work like a micro-abrasive, which means they can strip protective coatings and damage nearby hardware finishes [3][2].
"Trading a cleanable deposit for a permanent scratch is a bad exchange, and it happens routinely when someone loses patience." – Boise Bath [4]
If you use a powdered cleaner like Bar Keepers Friend, don’t sprinkle it onto dry glass. Used dry, the powder can act like sandpaper. Mix it into a wet slurry, keep the surface wet, and use a non-scratch pad – blue or white, not green – to reduce the chance of damage [5][6].
| Tool Type | Safe for Glass | Risk to Hardware | Best Use Case |
|---|---|---|---|
| Microfiber Cloth | Yes | Low | Weekly cleaning and drying |
| Silicone Squeegee | Yes | Low | Daily water removal after every shower |
| Non-Scratch Sponge (Blue/White) | Yes | Low | Removing moderate soap scum or light stains |
| Steel Wool (0000 grade only) | Yes (with caution) | High | Severe buildup on tempered glass only |
| Green Scouring Pads | No | High | Avoid – causes permanent micro-scratches |
| Razor Blades | No | High | Avoid – risks permanent surface damage |
| Magic Eraser | No (on coatings) | High | Spot cleaning uncoated glass only |
Upgrade your space with bathroom remodeling focused on comfort and functionality.
Not Rinsing and Drying the Door After Cleaning
A lot of people stop once the cleaner has done its job. That last rinse-and-dry step is what keeps the glass from looking streaky right away.
If loosened soap scum and cleaner residue stay on the surface, they dry back onto the glass as the water evaporates. So you end up laying a new film over the old one [1][3].
"A streak isn’t dirt – it’s a mineral deposit. Most cleaning hacks redistribute the minerals rather than removing them." – Ron Tu, Unikoo Glass & Hardware [7]
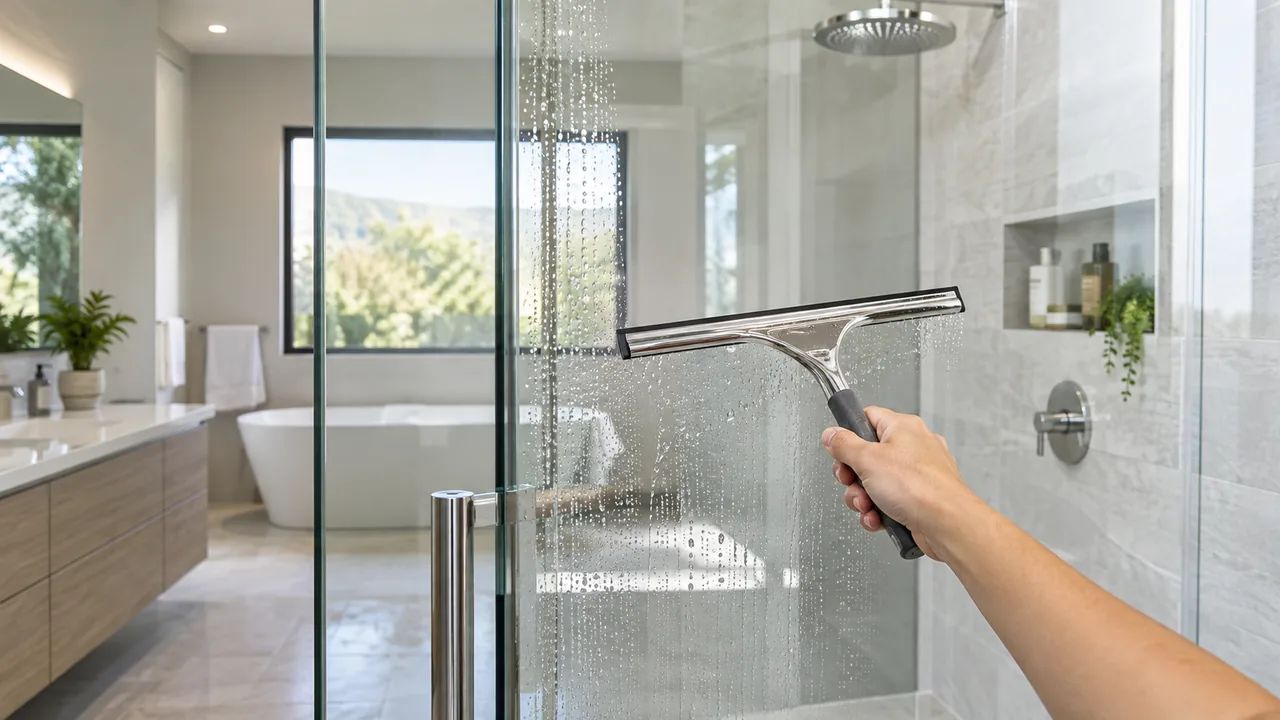
After cleaning, rinse the glass well with clean water. Then use a silicone-blade squeegee from top to bottom in three overlapping strokes: left, center, and right. That clears away 80% to 90% of standing water before it can evaporate [3][6].
Finish by wiping the bottom rail, tracks, and corners with a dry microfiber cloth. Those spots hold onto water longer than people think [5]. A daily squeegee habit takes about 10 to 15 seconds and prevents roughly 90% of hard water buildup [6].
Give the lower third of the door a little extra attention. That’s where water tends to splash, pool, and leave the heaviest buildup [5].
Root Causes That Keep Bringing Buildup Back
When spots come back fast, the issue is usually water, airflow, or damp surfaces – not the cleaner itself. So the fix starts with the shower setup, not another bottle under the sink.
Hard Water and Mineral Buildup
Hard water leaves white spots behind as water evaporates.
"Hard water spots aren’t a cleaning problem – they’re a drying problem." – Dulles Glass [3]
If buildup is already stuck on the surface, use an acidic cleaner and let it sit for 10 to 15 minutes. Just be careful: never use acidic cleaners on natural stone like marble, limestone, or travertine. They can etch the surface for good [5][10].
A good baseline routine looks like this:
- Squeegee the glass after each shower
- Run ventilation
- Use an acidic cleaner only when mineral spots show up
If water still leaves marks, the next thing to check is the rest of the shower enclosure.
Cleaning Only the Glass While Tile, Grout, and Corners Stay Damp
Glass won’t stay clean if grout, tracks, and corners keep sending moisture and residue back into the enclosure [5][8]. Cleaning the glass alone won’t stop buildup from coming back. If grout, rails, or corners stay damp, those areas need attention too.
Poor Ventilation After Showering
Poor ventilation slows drying on every surface – glass, tile, grout, and fixtures. The longer those surfaces stay wet, the more time minerals have to settle and soap film has to stick [5][8]. That’s a common reason buildup keeps returning.
The fix is simple: run the bathroom exhaust fan during the shower and for at least 20 minutes afterward [9][5]. If that’s easy to forget, a timer switch can handle it without any extra effort.
If buildup still comes back after drying and airflow get better, the problem may be outside day-to-day cleaning.
When Better Cleaning Is Not Enough
Sometimes the issue isn’t the cleaner or your technique. If you’ve used the right product the right way and the glass still won’t clear up, the cause is often the shower design or the glass surface itself.
Bathroom Layouts That Make Cleaning Harder
Some shower setups are harder to keep clean from the start. Framed enclosures, bottom tracks, and deep crevices hold water and soap scum. Tight corners make daily wipe-downs more annoying too, so buildup comes back faster.
If you’re planning a remodel, it’s smart to think past looks alone. A layout that keeps the glass easy to reach and fast to dry can save you a lot of scrubbing later. The Shower Remodel Guide walks through layout choices that affect long-term upkeep.
Signs the Problem Is Etching, Damage, or a Bigger Bathroom Issue
If the glass still looks cloudy after cleaning, check for etching or scratches. One simple way to tell whether cloudy glass can be cleaned or is permanently damaged is the fingernail test. [5] Drag a fingernail across a dry, cloudy spot. If it catches grit or lifts residue, the mark is a mineral stain that can be cleaned. If your nail glides across but the glass still looks frosted, the surface is likely etched. [5]
Etching is permanent surface damage that scatters light and leaves the glass looking hazy. Abrasive tools can cause that same dull look, and they can also give minerals more places to stick. If a proper acidic cleaner doesn’t change the cloudiness after the correct dwell time, the glass is likely damaged, not dirty. [4][5]
At that point, cerium oxide polishing may help, but replacement is often the more dependable fix. [5][6]
A few other signs can point to a bigger bathroom problem:
- A damp smell that sticks around after cleaning
- Grout or caulk that keeps staining
- Moisture spreading beyond the shower
Those issues can mean failing seals, drainage problems, or ventilation that isn’t doing its job. And no cleaner is going to solve that. [3][5][8]
Homeowner Checklist and Next Step
Before you buy another bottle, take a minute to check the full picture. Figure out what kind of buildup you’re dealing with, make sure nearby finishes can handle the cleaner, and look at whether poor airflow or damp corners are helping the grime come back.
If cleaning keeps failing, review the shower design, ventilation, and nearby materials before blaming the glass. The Bathroom Remodel Basics guide and the Complete Bathroom Remodeling Guide go deeper into those choices.
When buildup keeps returning, the next move is to look beyond the glass and check ventilation, drainage, and the shower’s layout.