

If your shower opening is square, backed well, and fits a standard door, I’d consider DIY. If the walls are off, the curb drains the wrong way, or the glass is heavy, I’d hire a pro.
A shower door install is not just a glass job. It’s a fit, support, and water-control job. Even a well-made door can leak or fail if the opening is out of plumb by more than 1/4 inch over 5 feet, if the curb slopes outward, or if there’s no solid backing behind the tile. And with tempered glass often weighing 60 to 100 pounds – and some frameless panels going past 120 pounds – handling the panel is a safety issue too.
Before I pick DIY or pro help, I’d check these first:
- Opening fit: Measure top, middle, and bottom. Order based on the smallest width.
- Wall straightness: If the walls are too far out of plumb, a standard kit may not seal well.
- Curb slope: Water should run back into the shower, not onto the floor.
- Wall support: Heavy glass needs blocking or studs at mounting points.
- Door type: Framed and semi-frameless doors are usually simpler than frameless doors.
- Tile risk: Drilling into stone, marble, or finished tile can turn one mistake into a big repair bill.
- Labor cost: Pro installation often adds about $500 to $1,000.
How to Install a Glass Shower Door (w/ Monica from The Weekender)
Quick Comparison
| Factor | DIY | Professional |
|---|---|---|
| Upfront cost | Lower | Higher |
| Best for | Standard framed or sliding doors | Frameless, custom, heavy glass, uneven openings |
| Glass handling | Hard and risky | Two-person crew, install tools |
| Leak risk | Higher if measurements or sealing are off | Lower if done right |
| Tile drilling | More chance of slip or cracks | Better control and process |
| Warranty | You carry the risk | Labor coverage may be included |
My rule of thumb: if the opening is clean, square, and simple, DIY can work. If the glass is heavy, the opening is uneven, or the bathroom finish is costly to damage, pro help is the safer call.
DIY Shower Door Installation: When It Is a Reasonable Option
DIY shower door installation can make sense when the opening is square, well supported, and fits a standard-size door. But those pieces need to line up. The door style matters. The condition of the opening matters. And your comfort with measuring, drilling, and sealing matters too.
Bathroom Conditions That Lower DIY Risk
The safest DIY setup is a standard-size framed or semi-frameless door going into a square opening with solid backing behind the tile. For most homeowners with basic tool skills, framed doors are the easiest place to start. They also give you a little more room for error because they can handle small plumb issues better than frameless doors.
If the walls are more than 1/4 inch to 1/2 inch out of plumb over a 5-foot span, you may be looking at custom glass or pro help [3][2]. That’s not a small detail. A shower door that sits out of line can lead to bad gaps, poor door swing, and leaks.
The shower curb matters too. It should slope inward so water runs back into the shower, not out onto the bathroom floor.
You also need solid blocking behind the tile for secure fastening. Without it, heavy glass panels can start to pull away from the wall over time. That’s the kind of problem people don’t notice until it turns into a repair bill.
Once the opening checks out, the next question is simple: can you measure it right, drill it cleanly, and seal it the right way?
What Homeowners Should Be Ready to Handle
Start by measuring the opening at the threshold, middle, and top, then order based on the smallest width [1][2]. That one step helps avoid sizing issues before the door even arrives.
Before you drill, dry-fit the tracks and jambs and check everything with a level. Put protection over the tile where you’ll drill so the bit doesn’t skate across the surface. When it’s time to seal, apply silicone to the outside seams where the glass meets the wall and curb, but leave the inside bottom edge unsealed so water can drain back into the shower [3]. If your opening doesn’t match the product instructions, stop there instead of trying to force it.
A helper isn’t optional here. Tempered glass panels usually weigh 60 to 100 pounds [1][3]. That’s more than enough to turn a simple install into a cracked tile, a shattered panel, or a trip to urgent care.
Warning Signs That DIY May Cause Damage or Rework
Some problems are hard stops, not minor hassles.
| Warning Sign | Why It Matters |
|---|---|
| Measurements change from top to bottom | The door may not hang plumb, which can lead to gaps and leaks. |
| Curb slopes outward | Water can run onto the bathroom floor. |
| Tile sounds hollow or shows cracks | The wall may not support the hardware safely. |
| No solid backing at mounting points | The panels may loosen or pull away over time. |
| Glass is too heavy to lift safely | There is a real risk of dropping or shattering the glass. |
Expensive stone tile, large custom panels, or odd angles usually move a job out of DIY territory. And if you can’t place the glass safely with one helper and basic tools, that’s your sign to stop.
Professional Installation: When Hiring a Shower Door Installer Makes Sense
Some shower door jobs are simply more than a careful homeowner should take on alone. If the opening is uneven, the glass is heavy, or the tile is fragile, bringing in a pro is the safer move. It’s not just about having the right tools. It’s about getting the fit right, cutting down risk, and protecting the bathroom work that’s already done.
The first thing a pro should do is check the opening, support, and water path before any installation starts.
What a Pro Should Check Before Installing the Door
A qualified installer should inspect the opening before drilling anything. They should confirm that the opening matches the door spec before making a single hole in the tile. They also need to check whether the walls are plumb, make sure the curb slopes inward toward the drain, and find studs or blocking behind the tile before choosing anchor points.
Solid backing behind the tile is required for secure fastening. That part can’t be guessed.
A pro should also look closely at the tile near anchor points. If the grout is crumbling or the tile sounds hollow near a hinge location, that needs attention before any glass goes in. They should also check the showerhead spray pattern so water doesn’t hit a seam or hinge head-on.
Projects That Usually Call for a Professional Installer
After the opening checks out, the next issue is the glass itself. Is this still a DIY job, or has it crossed the line?
Frameless glass doors usually land on the pro side. These doors don’t leave much room for error. Measurement tolerances are often down to the millimeter [5]. That kind of precision, paired with heavy glass, is where basic DIY tools and trial-and-error can go sideways fast.
Some projects almost always call for an installer, including:
- Neo-angle enclosures
- Steam shower doors
- Oversized custom panels
- Installations on stone, marble, or other tile that would be costly to repair if cracked during drilling
If the shower door is part of a larger bathroom remodel, it also helps to have the installer coordinate with the rest of the plan before the final tile and wall finishes go in.
How to Vet Shower Door Installers in Your Area
When you compare installers, look at the measurement process, warranty, and scope of work – not just the price.
Ask if the installer takes their own measurements before ordering the glass. Ask how they deal with walls that aren’t perfectly plumb. A solid answer should mention shims or custom-fabricated glass, not “we’ll make it work.” Also check whether sealing is part of the job, and ask for a labor warranty that covers leaks and alignment.
Insurance matters too. Confirm that the installer carries coverage for glass breakage during installation. With labor often costing $500 to $1,000 depending on the door type and job complexity [2], that kind of protection can be worth more than the labor cost itself if something goes wrong.
DIY vs. Professional Help: Cost, Risk, and Best Fit
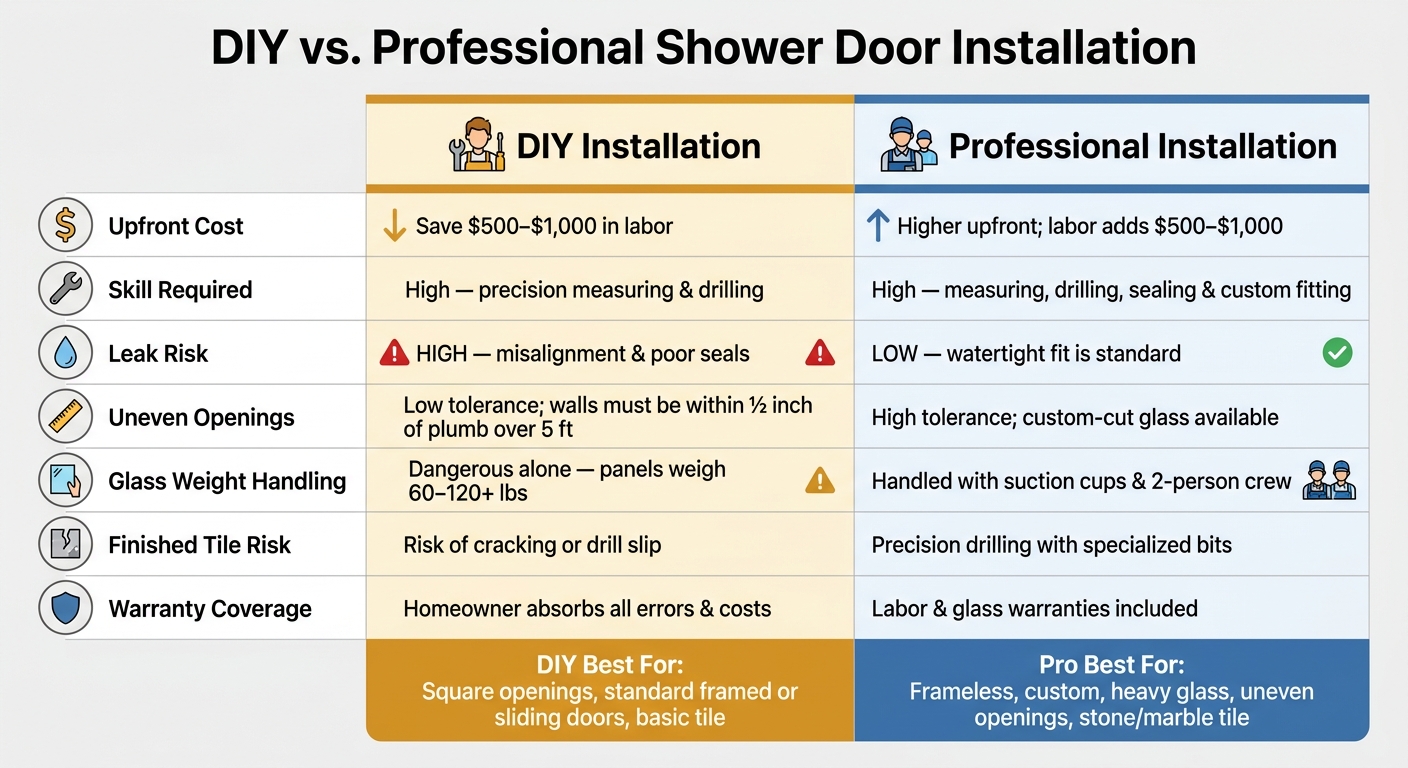
DIY vs. Professional Shower Door Installation: Cost, Risk & Best Fit
Use this side-by-side comparison to judge the opening you already have, not just the door you want to buy.
| Factor | DIY Installation | Professional Installation |
|---|---|---|
| Upfront Cost | Lower; can save $500–$1,000 in labor [2] | Higher; labor adds to the door cost [2] |
| Skill Required | High – precision measuring and drilling | High – precise measuring, drilling, and sealing |
| Leak risk | High – misalignment and poor seals can cause leaks | Low – watertight fit is standard |
| Uneven Openings | Low tolerance | High tolerance; custom-cut glass available |
| Glass Weight | Dangerous to handle alone (60–100 lbs) [1][3] | Handled with suction cups and a two-person crew |
| Finished Tile Suitability | Risk of cracking or drill slip | Precision drilling with specialized bits |
| Warranty Coverage | Homeowner absorbs errors and costs | Labor and glass warranties |
Use the checklist below to match the install method to the bathroom you have.
Upfront Savings vs. the Cost of Fixing Mistakes
Skipping labor can save $500 to $1,000 upfront [2]. That sounds good at first. But one bad measurement or one slip while handling the glass can wipe out those savings fast.
A frameless panel can weigh 60 to 120+ pounds, and that’s not something most people should try to move on their own [1][2]. If the panel drops or gets mishandled during installation, it can shatter and damage the tile underneath.
Bad measurements can get expensive too. If walls are more than 1/4 inch out of plumb, a standard DIY kit may not seal the way it should. That can lead to steady leaks and hidden water damage behind the scenes [3]. On top of that, many manufacturers require professional installation for warranty coverage. So if a DIY install goes wrong, the homeowner may end up paying for replacement parts out of pocket [5][4].
A Short Checklist to Make the Final Call
Before you choose a path, check a few things first:
- Is the door made for homeowner installation, or does it need custom measurement?
- Is the opening square, level, and within 1/2 inch of plumb over 5 feet? Measure at the top, middle, and bottom before ordering [2].
- Can you lift and position the glass safely with a helper and suction cups?
- Would one drilling mistake crack finished tile that would cost a lot to replace?
If the opening is square and the door is a standard size, DIY can make sense. If the glass is heavy, the opening is uneven, or the tile is already finished, hire a pro.
Conclusion: Match the Installation Approach to the Shower You Have
It comes down to one thing: does your bathroom fit the door’s requirements? A square opening with good support and solid backing is usually the best setup for a DIY job, especially if you’re installing a standard framed or sliding door. But if the walls are more than 1/4 inch out of plumb or the glass is heavy, it’s smarter to bring in a pro [3][1].
This is why planning before tile and wall finishes go in makes such a big difference. You have more room to fix layout issues, add backing where it’s needed, and make sure the opening fits the door, instead of trying to force the door to fit the opening.
Timing matters most during a remodel. If you’re doing a bigger bathroom project, choose the shower door early. That gives you time to add blocking, double-check measurements, and build the opening the right way from the start.
Get a free bathroom quote to have a local professional assess your shower opening.