

The short answer: in a small bathroom, I’d keep shower tile simple, light, and low-contrast. In a large bathroom, I’d use tile to add warmth, set one focal wall, and keep the shower tied to the rest of the room. For broader planning context, review the shower remodel guide. This choice also fits within a broader bathroom remodel.
Here’s what matters most before I pick anything:
- Small bathrooms: large wall tile, fewer grout lines, light or mid-tone colors, limited accent tile
- Large bathrooms: warmer colors, one main feature wall, tile scaled to the room, balanced contrast
- Shower floors: slip resistance matters most, and wet floors should meet DCOF 0.42+
- Drain setup matters: center drains usually need tiles under 4 inches on the floor; linear drains allow larger floor tile
- Slope matters: shower floors need about 1/4 inch per foot
- Cleaning tradeoff: mosaics add grip but mean more grout; glossy tile reflects light but shows water spots
- Material tradeoff: stone needs sealing every 6 to 12 months; porcelain usually does not
- Budget reality: a standard shower install often runs $1,500 to $4,500, while custom work can reach $5,000 to $10,000+
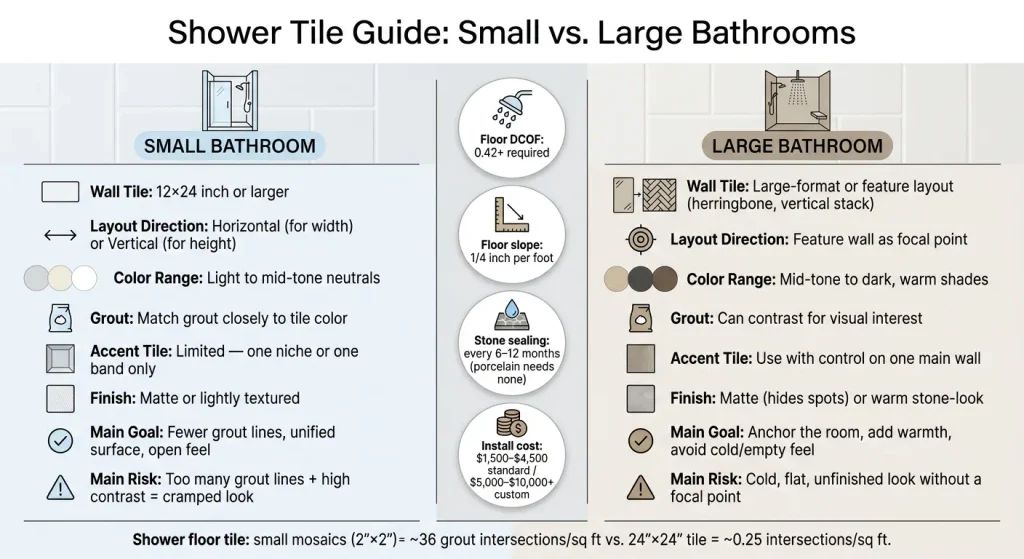 Shower Tile Guide: Small vs. Large Bathrooms at a Glance
Quick comparison
| Bathroom size | Best wall tile direction | Best color range | Accent use | Main risk |
|---|---|---|---|---|
| Small | Horizontal for width, vertical for height | Light to mid-tone | Keep it limited | Too many grout lines and too much contrast |
| Large | Feature layout on one main wall | Mid-tone to dark, warm shades | Use with control | Cold, empty look without a focal point |
If I wanted one simple rule to follow, it would be this: match tile size, finish, and grout to the room size, the shower floor slope, and how much cleaning you’re willing to do.
Small Bathroom Shower Tile Ideas That Keep the Space Open
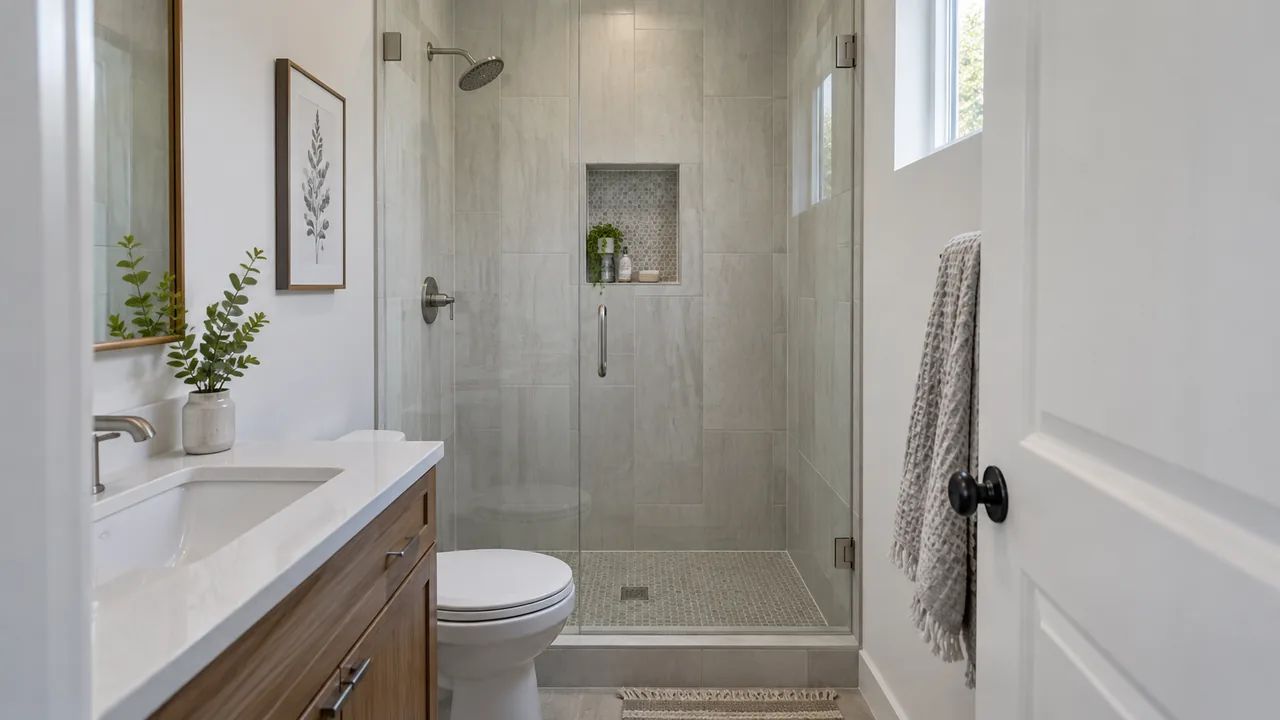
Use Tile Size, Color, and Grout to Cut Visual Clutter
In a small bathroom, the main goal is simple: make the shower wall look clean and continuous. When the eye sees fewer grout lines, the shower reads more like one surface instead of a checkerboard. That’s why 12×24-inch tile or larger often works well on shower walls in compact bathrooms [4][5].
Grout color plays a big part too. If you choose grout that’s within one shade of the tile body, the wall feels more unified. By contrast, high-contrast grout splits the wall into blocks, which can make the space feel busier and smaller [4][7].
Color also changes the mood of the room. Light, neutral tones bounce more light around and help keep a small shower from feeling boxed in [1][5]. And if upkeep is on your mind, there’s a smart tradeoff here: a matte or lightly textured finish tends to hide hard-water spots and soap scum better than glossy tile [2].
Use Layout Direction to Change How the Shower Feels
Once you’ve kept the tile itself simple, the layout can do a lot of heavy lifting. A rectangular tile set horizontally can make a narrow shower feel wider because it pulls the eye from side to side. If the ceiling feels low, turning that same tile vertically helps draw the eye up and gives the room more perceived height [4][7].
It also helps to run the tile from floor to ceiling. That avoids a visual stop in the middle of the wall, which can make the shower seem shorter.
On the shower floor, smaller mosaics are usually the better pick. They handle slope and drainage more easily, and they also give you better traction.
Keep Accent Tile Limited and Placed With Purpose
Accent tile works best in a small shower when you use it with restraint. A niche back wall or one accent band can add style without making the space feel crowded [1][2][4][5].
Try not to mix more than one or two accent finishes. Too many competing surfaces can make a small shower feel busy fast. One clean move is to match the niche interior tile to the shower floor mosaic. That keeps the look intentional instead of scattered [4].
Glass tile can also help brighten a small shower, but it works best when it stays in one small accent area rather than taking over the whole space [1].
Large Bathroom Shower Tile Ideas That Add Warmth and Balance
 Transform your bathroom into a modern and functional space with expert remodeling services.
More square footage still needs a plan. In a larger bathroom, the shower has to do more than simply fit the layout. It should anchor the room.
If the tile choices feel random, even a big shower can come off cold, flat, or a little unfinished. The aim is to fix that sense of emptiness so the space feels warm, well-sized, and comfortable, not just big.
Build One Main Wall That Anchors the Design
In a large shower, one wall usually grabs attention first. That wall should act as the focal point, not just serve as extra tile surface. Put your effort there.
A herringbone layout or large-format tile in a vertical stack can give that wall purpose without making the whole bathroom feel too busy.
Keep tile scale in line with the shortest wall dimension. Large-format tile cuts down on grout lines, while mosaics bring more texture but also more upkeep [4].
Choose Warmer Tones and Balanced Contrast
Large showers can handle darker or richer tile colors, mainly when the room gets good light. Warm neutrals, like travertine-look porcelain or wood-look plank tile, help the space feel grounded instead of sterile [1][6].
Natural stone like slate or travertine adds organic texture, but there’s a tradeoff: it needs sealing every 6 to 12 months. Stone-look porcelain gives you a similar look, with a water absorption rate below 0.5% and no sealing needed [1][2]. For most households, that’s the easier path.
Matte surfaces usually hide hard-water spotting better than polished tile. Glossy tile can make an enclosed shower feel brighter, but it will show more streaks [2].
Tie the Shower Tile to the Rest of the Bathroom
A shower can look good on its own and still feel off if it clashes with the vanity, floor, or hardware. Keep the shower tile in the same color family as those other finishes [4][7].
One small move can pull everything together: match the shower niche interior to the shower floor mosaic [4]. That choice matters even more when tile size, color, texture, and grout all start working together.
Tile Size, Color, Texture, and Grout: The Real Tradeoffs
With the main layout locked in, the next picks shape how the shower looks, feels, and holds up when it’s cleaned week after week. The four that matter most are size, color, texture, and grout.
Tile Size Tradeoffs for Walls and Floors
Tile size changes more than style. It affects layout, wall prep, and how much scrubbing you’ll do later.
On walls, large-format wall tile cuts down on grout lines. That sounds great, and often it is. But there’s a catch: larger tiles need flatter walls. If the wall is off, even a little, those flaws show up fast.
On shower floors, small mosaic tile is the safer pick. The floor needs to slope 1/4" per foot toward the drain, and small tiles can follow that curve [2][3]. Large tiles are stiff, so they don’t bend to match the slope [3]. Small mosaics also add traction because they create more grout joints. A 2"×2" mosaic makes roughly 36 grout-line intersections per square foot, while a 24"×24" tile creates only about 0.25 [4].
| Tile Size | Visual Effect | Grout Line Count | Cleaning Effort | Best Use |
|---|---|---|---|---|
| Small (1"–2" mosaic) | High-contrast and textured | Very high | High (more scrubbing) | Shower floors (grip and slope) |
| Medium (4"–8") | Traditional, balanced | Moderate | Moderate | Small bathroom walls and floors |
| Large (12"×24"+) | Seamless, expansive | Very low | Low (less grout) | Shower walls; large bathroom floors |
After you choose size, color and finish do most of the work when it comes to light, mood, and upkeep.
How Light, Mid-Tone, and Dark Tile Change the Room
Color changes how big the room feels. It also changes what you notice first when the shower gets dirty.
Light tile bounces light around, so small bathrooms tend to feel more open. The downside? It shows hair and dark bits fast. Dark tile brings warmth and drama, but it also makes soap scum and hard-water marks stand out. Mid-tone tile sits in the middle and usually does the best job hiding day-to-day grime.
| Tile Color | Brightness | Visual Warmth | How Much Grime Shows | Best Fit |
|---|---|---|---|---|
| Light | High (reflective) | Low, cool | Shows hair and dark debris | Small bathrooms |
| Mid-tone | Moderate | Balanced | Hides most grime well | Any bathroom size |
| Dark | Low (absorbs light) | High, dramatic | Shows soap scum and hard water | Large, well-lit showers |
Grout color matters too. If the grout is close to the tile color, the surface looks calmer and less broken up. If it contrasts, every tile stands out more.
Gloss, Matte, and Texture: Safety and Cleaning Compared
Glossy tile works best on walls only. It tends to show hard-water spotting and soap scum much more than matte surfaces [2]. Matte finishes are usually easier to live with.
On the floor, safety comes first. The industry standard for wet floors is a Dynamic Coefficient of Friction (DCOF) of 0.42 or higher [1][2]. Polished or glossy tile usually comes in under that mark, so it should not go on a shower floor.
There’s a tradeoff here too. More texture gives you more grip, but it also holds onto more grime. For most showers, a matte or lightly textured tile with a verified DCOF of 0.42+ hits the sweet spot: enough traction without making cleanup a chore.
For grout, epoxy grout is a strong option on floors and inside niches. It resists water and does not need sealing [1][2].
Installation, Budget, and Final Planning Before You Choose
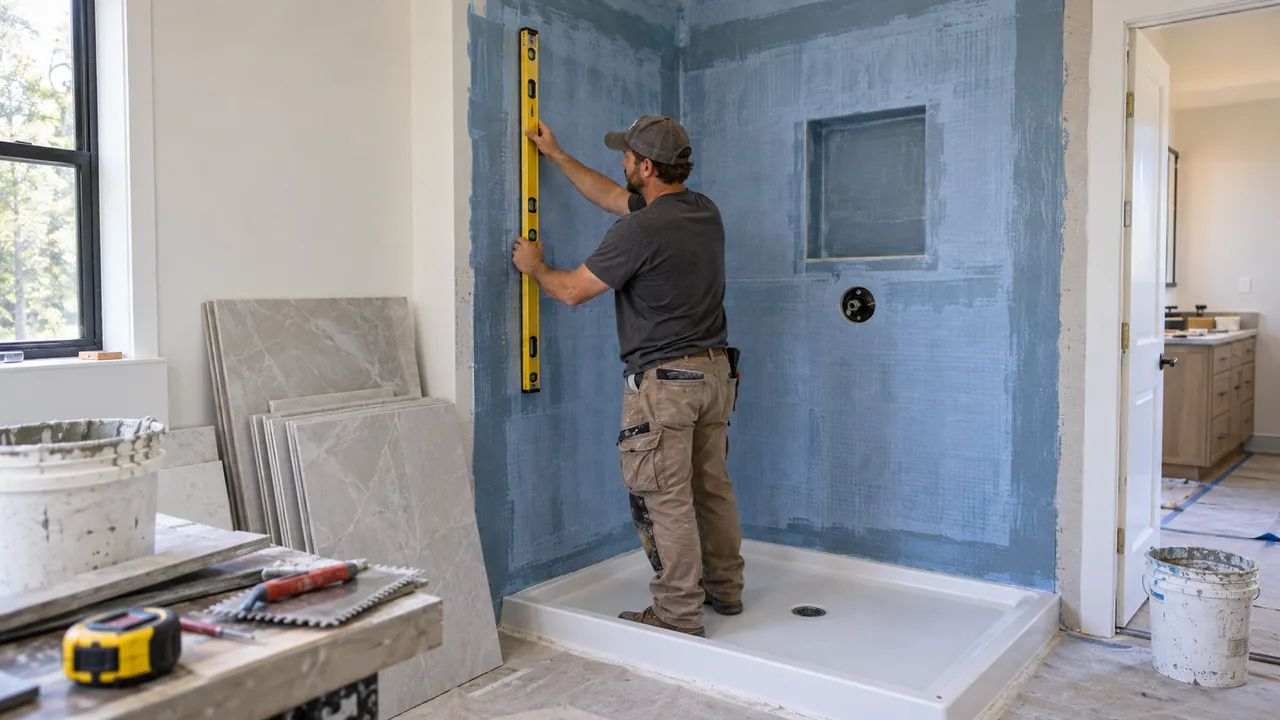

Once you’ve picked the look, the next part matters just as much: installation. A shower can look great on day one and still fail early if the work behind the tile isn’t done right.
Waterproofing and Wall Prep Come Before Decorative Choices
Tile is the surface you see. The waterproof membrane is what keeps the shower safe from moisture. So before you think about patterns, finishes, or accent walls, make sure the base is sound.
Before new tile goes in, check for walls that flex when you press them, grout that keeps cracking, musty smells, or loose tile. Those are common signs that moisture may already be getting where it shouldn’t. New tile by itself won’t solve that problem. [1]
Once the substrate is protected, it’s time to look at how your tile picks affect labor and budget.
Where Tile Choices Drive Project Cost
The tile itself is only part of the price. Labor, prep work, and waterproofing can shape the final bill just as much as the material. A 60-square-foot shower usually costs $1,500 to $4,500 to install. Custom showers with stone, niches, or benches often land in the $5,000 to $10,000+ range. [1]
| Cost Factor | Typical Range | Notes |
|---|---|---|
| Tile material | $1–$35+/sq. ft. | Ceramic is lowest; natural stone is highest |
| Standard labor | $8–$15/sq. ft. | Complex patterns add $2–$6/sq. ft. |
| Prep and waterproofing | $2–$5/sq. ft. | Backer board, membranes, and grout |
| Large-format tile (15 inches or larger) | Higher labor + leveling | Needs very flat walls |
A simple straight-lay pattern is usually the safest choice if you want labor costs to stay more predictable. Herringbone and diagonal layouts take more time and create more waste. In many cases, it makes more sense to put that money into proper waterproofing.
That trade-off tends to matter most in small bathrooms, where a clean, simple layout often looks better anyway. In larger bathrooms, paying more for a focal wall can make sense because that’s where the visual impact shows up most.
Conclusion: Match Your Tile Plan to the Room and Daily Use
Small bathrooms usually work best with simpler layouts, lighter visual weight, and fewer grout lines to clean. Large bathrooms need warmth, tile that fits the scale of the room, and a clear focal wall so the space doesn’t feel empty or cold. Slip resistance, grout type, and waterproofing aren’t extras. They’re the base layer that helps the whole shower hold up.
When cost and installation details are clear, compare your top choices in the room’s actual lighting. Make sure waterproofing is included in the scope, match tile size to the room, and price the full job before ordering anything. If you’re ready to move from planning to pricing, Koalaty Remodel lets you request a free bathroom quote and connect with licensed local professionals who can assess your walls, layout, and budget before a single tile is chosen.